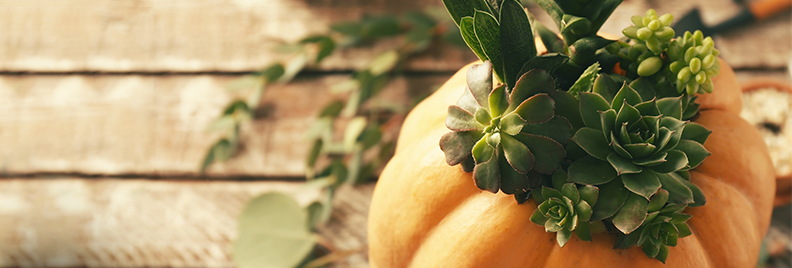
How To Make A Succulent Pumpkin Planter
Everything You Need To Make Your Succulent Pumpkin Planter
Assembling Your Succulent Pumpkin Display
Just when you thought autumn couldn’t possibly get any more satisfyingly picturesque, succulent pumpkin planters arrived on the scene, and we are LIVING for it. Seriously, succulents AND pumpkins together in one perfect display?! This is a straight-up blessing from the autumnal Gods that we didn’t even know we needed. We haven’t been this hyped about a mashup since Nutella flavored Oreos hit the shelves here in Houston. To make your own DIY pumpkin succulent planter for home (or to give away as a gift, because let’s be real, that would be the sweetest gift ever), follow this simple guide!
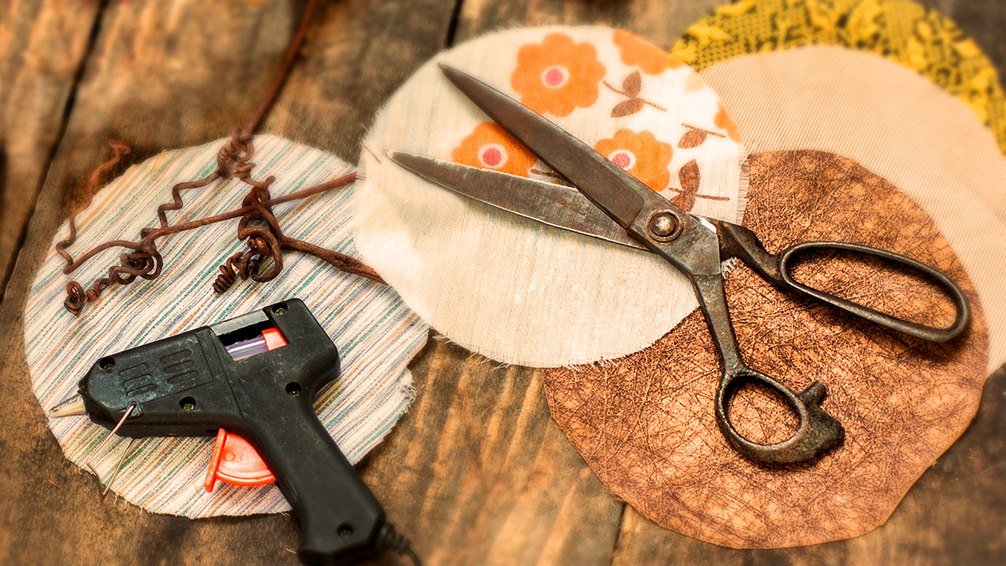
Everything You Need To Make Your Succulent Pumpkin Planter
If you’re the type who gets grossed out from scooping out gooey pumpkin guts, we have good news for you! This pumpkin DIY project requires zero scooping. The pumpkin stays intact, so it will last way longer than a Jack-O-Lantern. You can expect your planter to last at least for a few months, and once the pumpkin starts to get a little funky, you can remove the plants and transplant them into new succulent pots. Here’s a list of everything you’ll need to get started:
- A pumpkin. Well, duh. But not just any pumpkin! The best kind of pumpkin for this project should have a flat top, so try to find one that has a decent amount of surface area on top.
- A hot glue gun. Any crafters best friend!
- Scissors or small gardening shears.
- Sphagnum moss.
- Assorted succulents and clippings. Grab a bunch of different kinds in all shapes and sizes. The more colorful, the better!
- Paint (optional). If you really wanna get “boujee” with your pumpkin succulent planter, you could paint it! Some metallic rose gold accent paint would look pretty amazing, just saying.
- Mister/spray bottle.
- Chopsticks or skewers. These are just to help press the succulents into the moss on top of the pumpkin.
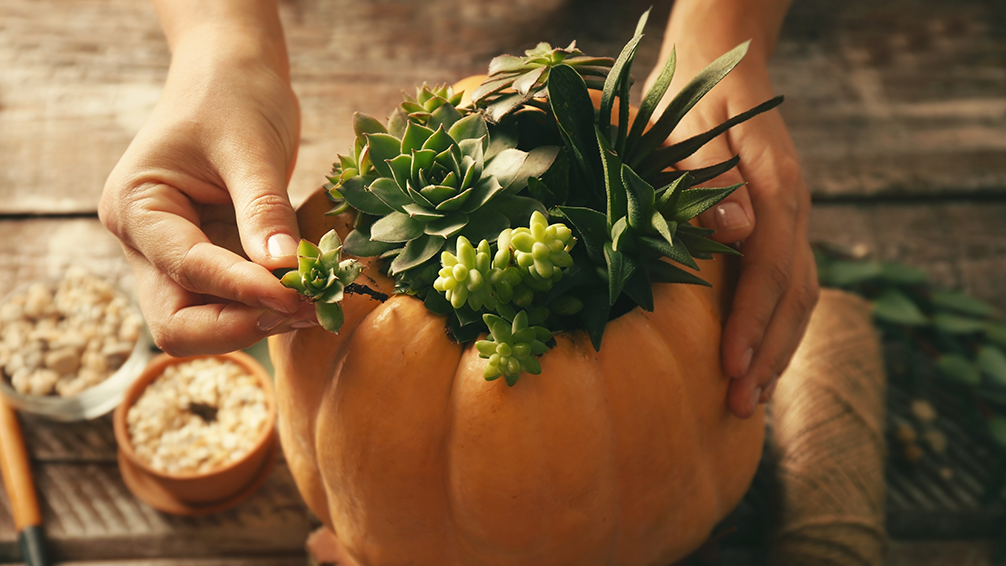
Assembling Your Succulent Pumpkin Display
This craft is a pretty easy project you can finish in one afternoon. Heck, if you wanna invite some friends over, pour some drinks and make a night of it, this would make a seriously fun ladies night. Follow these simple steps to make sure your succulent pumpkin is picture-perfect:
- Let the succulent stems dry out. You’ll be affixing all those clippings to the sphagnum moss, but if the ends are moist and haven’t dried up, they’ll end up soaking up too much moisture. You’ll get the longest-lasting results if you allow the bottoms of the succulents to “scab over”— (sorry, that sounds much grosser than it really is).
- Apply hot glue on top of the pumpkin, and press the moss into it. Be careful not to burn your fingers! Try to apply a nice even layer, and fill in any gaps with a few extra tufts.
- Apply the larger succulents first. The basic rules of planter design pretty much suggest that larger, taller pieces should go in the middle, smaller pieces should surround them and fill in the gaps, and any trailing plants should go along the edge so they can spill down. The weight of the bigger plants will also be better supported in the middle of the pumpkin. Dab on a few dots of hot glue to the bottom of the plant, and press them into the moss so they hold steady.
- Add in the smaller succulents, and fill in any gaps with little succulent clippings. These arrangements look best when you can densely pack as many different cuttings together as possible. If it’s sparse, it looks a little awkward and sloppy. Ignore the “less is more” trope and really go to town on this one.
- Attach some trailing succulents (if you want them). You can go with or without the “spiller” plants, but personally, we kind of love the added drama of a trailing succulent pouring down the sides of a planter. When attaching them, try to tuck them under the other succulents so they don’t look too tacked-on, and make sure they’re glued securely onto the moss so their weight doesn’t pull them off. Some good succulent spiller plants include Burro’s Tail, Banana Vine, String of Pearls, or Lemon Ball Stonecrop.
- Moisten the moss every couple of days with the spray mister. Our weather tends to be on the drier side here in Houston, so you’ll need to keep up with watering regularly so that your plants don’t get fatigued. Try not to get the water directly on the succulents—aim for the moss to prevent them from getting funky. Succulents can be a little temperamental sometimes, but as long as you stick to applying moisture directly to the growing medium, they shouldn’t give you too much sass.

Boom! You’re done! It was that easy! Not gonna lie, the succulent pumpkin planter is, without a doubt, the cutest of all the fall container arrangements. With how amazing they look and how easy they are to put together, this DIY project can be a bit habit-forming. But, like we said, they make fabulous gifts, and they last for several months, so why not make a whole bunch in different sizes, shapes, and colors? We have so many different succulents in a whole spectrum of colors at our greenhouse in Houston, so stop by sometime this season so you can make your own swoon-worthy centerpiece.